If you've ever found yourself wondering how to clear the cache on Kodi, you're in the right place. It's a surprisingly simple process, whether you use a maintenance addon or just delete the files manually. More importantly, it's often the single most effective fix for annoying issues like constant buffering and sluggish menus, especially when you're enjoying your favorite IPTV service. For a top-tier IPTV experience, check out our recommended provider IPTV Now.
The best part? It gets rid of all the bloated temporary files without ever touching your addons or media library.
Before we dive into the "how," let's quickly cover the "why." Understanding what the cache does makes it obvious why clearing it is so critical for a smooth streaming experience. Think of the Kodi cache as a temporary holding area on your device. It's designed to speed things up by keeping frequently used data—like thumbnails and little bits of video—close at hand.
It's a bit like a cluttered desk. At first, having everything out helps you work faster. But over time, it just becomes a mess of old papers and junk, making it impossible to find what you need. The Kodi cache works the same way. As it fills up with outdated and unneeded files, it starts to cause the very slowdowns and errors it was meant to prevent. This is the real culprit behind a lot of Kodi frustration.
Keeping your Kodi cache clean is a basic maintenance task that has a huge impact on performance. The cache is supposed to help, but when it gets too big, it does the opposite. On devices with limited space, like an Amazon Firestick or an NVIDIA Shield TV Pro, that cached data can swell to several gigabytes.
It's not uncommon for users to report cache sizes ballooning past 5GB after just a few weeks of watching videos and browsing libraries. That eats up your storage fast. For a deeper dive into cache management, this guide from VPNCheck.org is a fantastic resource.
If you remember one thing, make it this: clearing your Kodi cache is completely safe. It will not delete your addons, your media library, or your personal settings. It just gets rid of temporary junk files.
So, how can you tell if a bloated cache is messing with your setup? It usually leaves a few obvious clues.
Before you start troubleshooting, it's helpful to know if the cache is actually the problem. A full or corrupted cache can cause a surprising number of performance issues that might seem unrelated at first.
Use this quick reference to diagnose common symptoms caused by a full or corrupted Kodi cache.
| Symptom | What It Means | How Clearing Cache Helps |
|---|---|---|
| Constant Buffering | The device can't load video data fast enough because it's bogged down by old, irrelevant cache files. | Frees up system resources, allowing Kodi to stream new data efficiently without interruptions. |
| Sluggish Menus | Kodi struggles to load UI elements like posters and fanart because the thumbnail cache is overloaded or corrupted. | Removes old thumbnails and junk data, allowing the interface to load fresh, clean assets quickly. |
| Random Crashes | A corrupted cache file can cause conflicts within the application, leading to unexpected freezes or shutdowns. | Deletes the problematic temporary files, resolving the conflict and restoring application stability. |
| Playback Errors | Outdated or incomplete video fragments in the cache can prevent new streams from starting correctly. | Wipes the slate clean, ensuring Kodi isn't trying to use old, broken data to play a new video. |
If you spot any of these signs, don't panic. These are classic indicators that your cache just needs a quick cleanup.
If you're nodding along to any of these symptoms, learning how to clear the cache on Kodi should be the very first thing you try. It's the easiest and most effective troubleshooting step in the book.
For a lot of folks, the simplest answer to the how to clear cache on Kodi question is to just grab a good maintenance addon. This is easily the most straightforward, one-click solution out there. It's the perfect route if you're not keen on digging around in your device's system files. The whole cleanup process is automated, so it's both safe and efficient.
This method is a real lifesaver for streaming devices where getting into the file system is either locked down or just a huge pain—think devices like the Amazon Fire TV Stick 4K Max. Instead of hooking your device up to a computer or side-loading a file manager app, you can do everything right inside the Kodi interface. You’ll have things running smoothly again in just a couple of minutes, no tech wizardry required.
First things first, you need to find a reliable maintenance tool. You'll usually find these tucked away inside third-party repositories. You'll have to add the repository to Kodi's file manager before you can get to the good stuff. Once that's done, you can install it using the "Install from zip file" option in your addon browser.
With the repository installed, just head over to "Install from repository," find the one you just added, and look for a program or maintenance addon. The popular tools usually have pretty obvious names, making them easy to spot. After it's installed, you'll find the addon waiting for you in your "Program add-ons" section.
A good maintenance addon does more than just clear the cache. It often provides a suite of tools to keep your Kodi setup in top condition, handling everything from old package files to obsolete thumbnails.
Okay, with your chosen maintenance addon installed, pop it open from the "Program add-ons" menu. You'll usually be greeted with a simple list of cleaning options. The ones you need to fix performance hiccups are almost always clearly labeled.
Keep an eye out for these common cleanup functions:
All you have to do is click on each of these options. The addon will do its thing in the background and let you know when it's finished. In just a few clicks, you’ve given your system a solid cleaning without ever leaving the Kodi app. Honestly, for most people, this is the most direct and hassle-free way to keep a Kodi setup healthy.
While maintenance add-ons are a fantastic one-click fix, sometimes you need to roll up your sleeves and get your hands dirty. Going in and manually clearing the cache gives you total control and a much better feel for how Kodi actually works under the hood—a skill that can be a real lifesaver for future troubleshooting. This just means hopping into your device's file system to find and nuke the temporary files directly.
Don't worry, this isn't nearly as technical as it sounds. The only tricky part is knowing exactly where to look, since the file path is different for every operating system. Once you find the right folder, it’s as simple as deleting its contents. This approach is perfect if a specific addon is acting up or if you just want to be absolutely sure every last temp file is gone.
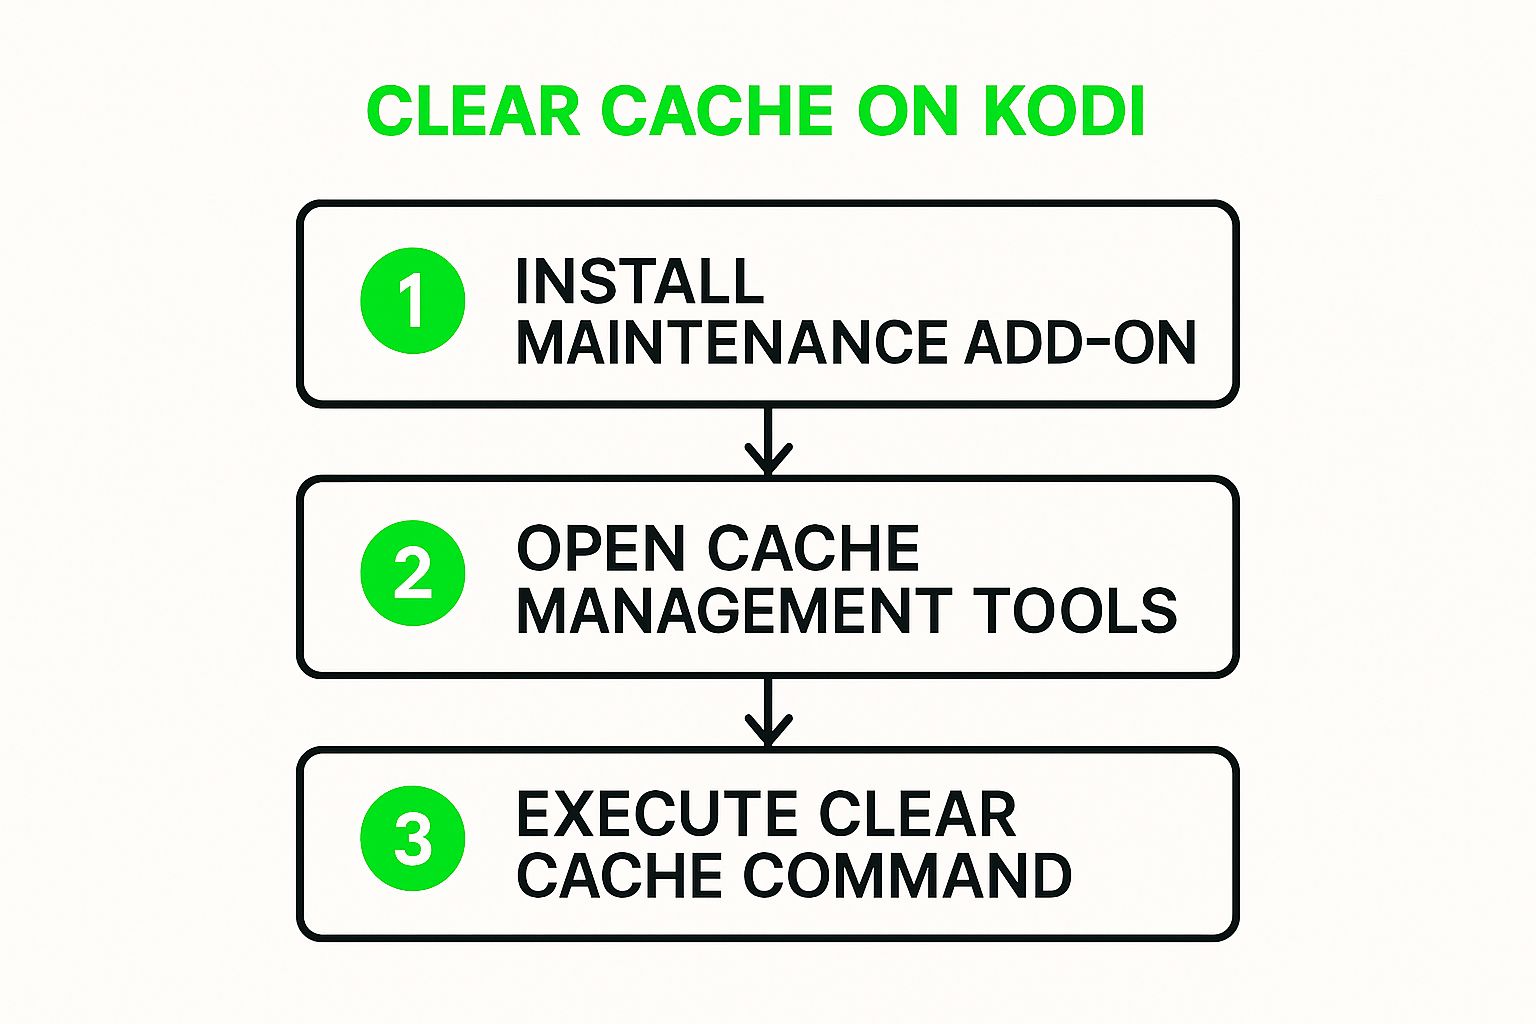
This diagram actually shows the super-simple, three-step process for using a maintenance add-on. It's a great visual for just how efficient those tools are compared to the manual method we're about to tackle.
First things first, you'll need a file manager. If you're on a device like an Amazon Firestick, an app like "File Commander" or "ES File Explorer" from the app store will do the job perfectly. For Windows users, the built-in File Explorer is all you need. The real challenge is just navigating to the right directory.
Here are the most common spots you'll find the cache folder:
Android/data/org.xbmc.kodi/files/.kodi/temp/C:Users[YOUR_USERNAME]AppDataRoamingKoditemp/Users/[YOUR_USERNAME]/Library/Application Support/Kodi/temp/A quick heads-up for Windows folks: The
AppDatafolder is hidden by default. To unhide it, just open File Explorer, click the "View" tab up top, and tick the box for "Hidden items." That'll make the folder pop up so you can get to the path.
Once you make it to the temp folder, you're in the right place. This is Kodi's digital dumping ground for all its temporary files, cache data, and installation packages. For IPTV users especially, keeping this folder clean can be the secret to a smooth streaming experience. If you're just getting into the IPTV scene, our guide on https://freeiptvplayer.net/how-can-i-get-iptv/ can help you get started.
You're safe to delete pretty much everything inside the temp folder. Go ahead and select all the files and folders within that directory and delete them for good.
Just make sure you do not delete the temp folder itself—only what's inside it. Wiping out the entire folder can make Kodi act up or even prevent it from starting altogether.
After you've cleared everything out, give Kodi a restart. It will automatically recreate any essential files it needs inside the now-empty temp directory. You should feel the difference right away, with snappier menus and smoother navigation. This manual method puts you in the driver's seat, ensuring a deep clean for a healthy system.
Clearing your cache is a fantastic way to fix streaming problems after they pop up, but what if you could get ahead of the game and prevent buffering altogether? For those of us who demand top performance, especially when streaming high-bitrate content from an IPTV provider, there's a more advanced trick that can be an absolute game-changer. It involves creating a special configuration file, advancedsettings.xml, to tell Kodi exactly how much of your device's RAM to dedicate to the video buffer.
This little text file makes a world of difference for anyone with a less-than-perfect internet connection or those trying to stream massive 4K files. By manually increasing the video cache size, you're essentially creating a bigger safety net, letting your device download more of the video ahead of time. This is key to ensuring your streams play without those frustrating interruptions.
advancedsettings.xml FileFirst things first, you'll need to create a simple plain text file and name it precisely advancedsettings.xml. Inside this file, you can add specific commands to control Kodi's behind-the-scenes behavior. For our buffering problem, the most important tag is memorysize, which dictates how much RAM Kodi allocates for its video cache.
The numbers don't lie. Increasing Kodi's cache allocation can crush buffering issues. By default, Kodi only uses a tiny 20MB for its cache, which is often not enough. Experts and power users have found that bumping this value up to between 192MB and 256MB on devices like the Fire Stick dramatically improves streaming stability. In fact, a 2024 Reddit user community reported that buffering times dropped by up to 70% after making this change.
Pro Tip: This tweak is powerful, but it's not magic. It works best when your network is already in good shape. Before diving into Kodi's settings, make sure your connection is as stable and fast as possible. Check out our guide on how to optimize your internet connection for some quick and easy improvements.
To put this fix into action, just drop the advancedsettings.xml file you created into Kodi’s Userdata folder. The location of this folder changes depending on your device, but you can usually find it in the same parent directory as the temp folder we talked about earlier. Once the file is in place, restart Kodi. The new settings will take effect immediately, paving the way for a much smoother streaming experience.
A clean cache is a great start, but if you want to truly master Kodi, you need a simple, repeatable maintenance routine. Staying on top of things is the best way to prevent future performance headaches and ensure your streaming setup is always ready when you are.
Think of it less as a chore and more as a quick health checkup for your system.
Following a consistent schedule is what keeps your Kodi installation running fast, stable, and secure. Just a few minutes every month can make a massive difference in the long run.
The whole point is to create a routine you can actually stick with. For most people, a quick monthly check-in is more than enough to keep things humming along.
Here’s a practical schedule you can follow:
This small time investment pays off big time in performance. It's a proactive habit that keeps your streaming smooth, much like how cord-cutters adopt new habits to manage their entertainment. Our guide on how to cut the cord with cable TV explores similar lifestyle adjustments for a better viewing experience.
As Kodi has grown in popularity, cache overload has become a major pain point for users. In some community forums, complaints on this topic can make up as much as 40% of all technical discussions. This just goes to show why a simple routine is so important. You can discover more insights about cache best practices on TroyPoint.com and read up on other user trends.
Even after walking through the process, a few questions usually pop up about clearing the cache in Kodi. It's totally normal. Let's tackle the most common ones so you can feel completely confident keeping your system in top shape.
This is probably the biggest question people have, and the answer really depends on how you use Kodi.
If you're a heavy streamer, watching content daily, getting into the habit of clearing the cache every week or two is a great idea. It’s a simple preventative measure that stops performance problems before they even start. For more casual users, once a month is usually plenty to keep everything running smoothly.
The best rule of thumb? Just clear it whenever you notice things getting sluggish. If buffering is suddenly a problem or menus are slow to load, clearing the cache should be your first troubleshooting step.
Nope, not at all. This is a common worry, but it’s a completely safe process.
Clearing the cache only removes temporary files—things like image thumbnails and leftover video fragments from streaming. Your installed addons, your carefully curated media library, personal settings, and any custom builds are left completely untouched.
It's very different from clearing an app's data, which would reset everything back to factory settings. Think of it as a light cleanup, not a deep purge. For more tips on keeping your streams in good order, you might want to read our guide on IPTV with catchup capabilities. It's another great way to get more control over your viewing experience.
At Free IPTV Player, we believe in making streaming simple. Test your M3U playlists directly in your browser without any downloads. Get started at https://freeiptvplayer.net.